Flash New Firmware on Sonoff Device
This post was written by Robert B. Edited by Mohan G.
In this case we are using the Sonoff POW which comes with a chip HLW8012 to provide current and voltage measuring functionality.
You will need:
- a four pin header to be soldered onto the Sonoff PCB
- a FTDI-usb adapter to connect the Sonoff device to your PC/laptop - buy one like this that has a jumper to allow you to switch from 5V to 3.3V
Download:
Details
WE ARE DEALING WITH 240 VOLTS. SAFETY PRECAUTIONS WITH LIVE ELECTRICITY SHOULD BE OBSERVED
ALSO, THE 4 PINS ARE 3.3V TOLERANT, NOT 5V TOLERANT
Ensure there is no power to the device so that you remain alive throughout this project. Only use the USB-serial adapter to do the upload and configuration. You must not connect the usb-serial device while connected to 240V.
First, need a hardware hack.
- Prise open the case with a small screwdriver or strong fingernails.

- Using a soldering iron solder the header into the four holes
  at the end of the Sonoff PCB furthest from the wire connection terminals.

- Inspect carefully to ensure there are no solder bridges and that the joint
  has good connection for good electrical conductivity.
Setup Arduino IDE.
Go to File → Preferences and paste this URL into the field “Additional Boards Manger URLs”.
http://arduino.esp8266.com/stable/package_esp8266com_index.json
Then goto Tools-> Board:”xxxx”-> Boards Manager. In the search box type esp8266, click on the entry and hit Install

Make these changes.
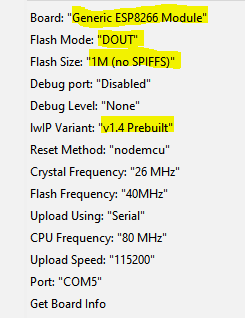
Double-check that the setting Flash Mode is set to DOUT. Failure to do so may brick your Sonoff.
Download Tasmota Firmware
Download Tasmota from here. Install the development version.
Unzip it and put somewhere on your computer. For me that created a directory called Sonoff-Tasmota-development.
In the Arduino IDE, open the file Sonoff-Tasmota-development/sonoff/sonoff.ino . This should open a bunch of tabs.
Copy libraries to correct folder
The directory Sonoff-Tasmota-development/lib contains libraries that needed by be copied to the default location for Arduino libraries. In the case of my Windows 10 machine, it is C:\Users\username\Documents\Arduino\libraries
Override user_config_override.h
Empty the contents of the file user_config_override.h and replace its contents with the file here
In this file, change wifi details.
If you have followed the steps correctly, you should hit verify and it should compile without error.
After the first time you upload, any changes to this file will require a change to the value CFG_HOLDER, otherwise the change will not be reflected on the device.
Backup Original Firmware
Before proceeding further, take a backup of the original Sonoff firmware. here
Upload Instructions
Put sonoff into Upload Mode
The sonoff has to be put into an “upload mode” before upload. Here is the procedure:
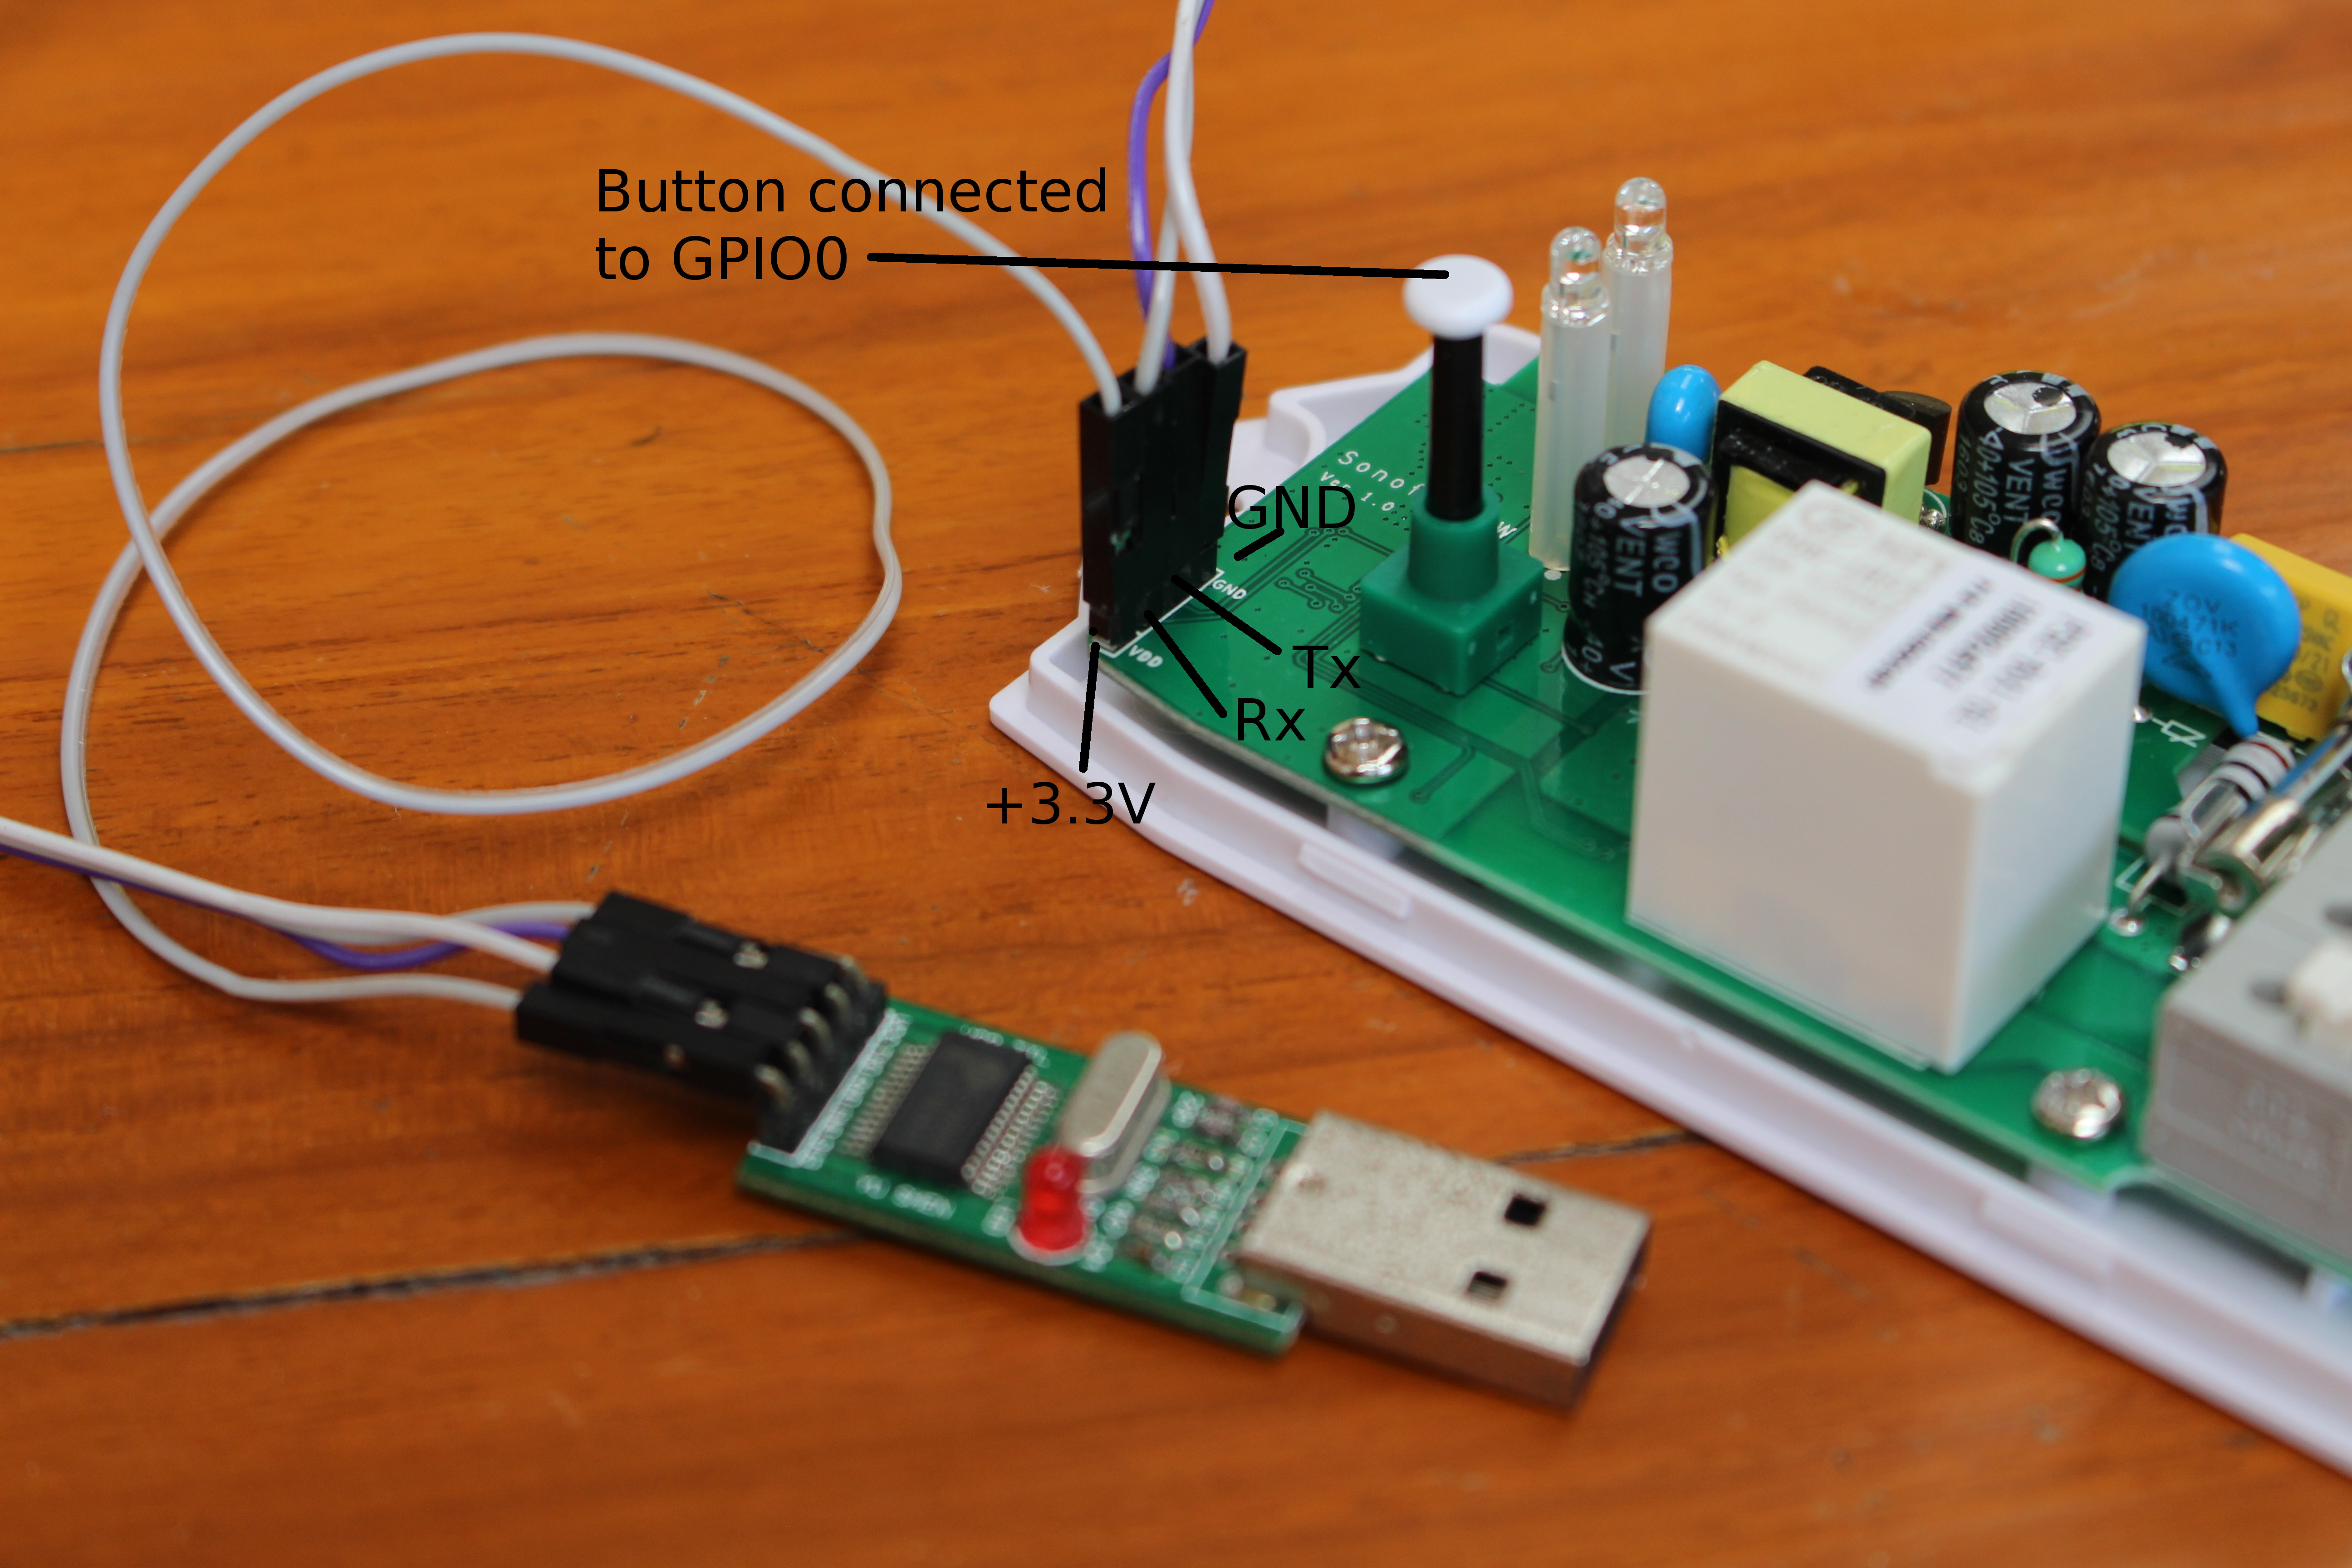
- Connect three wires GND, TX and RX between the FTDI adapter and the Sonoff PCB header.
- Press and keep holding down the button on the Sonoff device.
- Connect VCC wire to put power onto the Sonoff.
- Hold the button for a further 2 seconds and release.
- It seems RX on USB-FTDI adapter has to be connected to RX on sonoff header. If it doesn't work, try the other way.
Ready to Upload
Before uploading:
-  Check the correct port is selected and double-check the board paramters in Tools menu
-  Start the Serial Monitor and change baud rate to 115200
-  Make sure that the Serial Monitor is visible and open during upload.
Now you can click on the Upload option in the Arduno IDE . This commences the compile step and the flashing of the file will follow. This will take a few minutes. If you get espcomm errors, try swapping RX and TX, then put into upload mode and upload.
Set SONOFF MODULE after upload
If all goes well, the Serial monitor should reveal IP address of Sonoff - if you miss it, use Advanced IP Scanner.

Then type IP address into browser. You should see this screen.

To change Sonoff Module, Press configuration.

Press Configure Module.

Then select SONOFF POW, click Save. Then disconnect USB-serial adapter, reconnect and go to the browser and type the IP address of the SONOFF. The SONOFF POW module should now be showing.
It is at this step that we can disconnect USB-serial adapter and plug 240V in.
Buttons
Commands
NodeRED
-
Select Configration → Other and select the MQTT Enable tick box. Save the config change and return to the main Menu.
-
Select Configration → MQTT. In the Host field change the text to the IP address of your Raspberry Pi or laptop where you may want to run an MQTT broker or collect info in a database. Save the config change.
-
Select Configration → Logging and change the Telemetry Interval to something appropriate for your application. For current and power this might be 30 seconds or even shorter. If you are monitoring temperature then something longer such as 300 seconds may be more appropriate. Again save the config changes.
The menu item Console allows you to see the MQTT message topic format as well as other status information. There are many options from here so you can explore endlessly to uncover the capabilities of this device and the new firmware.
One good option for dynamic display of the variables being logged is Node-Red and its Dashboard. Mohan has provided a copy of a Flow file that could be used for this.
If you wish to send the data to charting websites you can visit a number of options here: http://moxd.io/2015/10/public-mqtt-brokers/ This list can be extended with Thingspeak, EasyIoT, Cayenne myDevices etc..
To store the data locally on your Raspberry Pi you could choose between InFluxDB with Grafana or RrdTool for a database manager. The latter option may require more manual setup to achieve nice graphs.
Here is a python script to store the Sonoff POW “Power” data stream to rrdtool. here
Here is another one to toggle the Sonoff the relay on and off at intervals. here
Have fun exploring!
p.s.
For mqtt in python you will need to :
sudo apt-get install mosquitto-clients
sudo apt-get install mosquitto
sudo apt-get install libmosquitto-dev
sudo pip install paho-mqtt


Leave a Comment